Warehouse Management System
The Barcode Scanner application comes in two parts, a Host and a Client. The Host is responsible for processing requests for clients and invoking the appropriate actions in the Deacom system. The Client is the application with which users will interact. While a single Host will run on a server, many Clients may be running on individual scanners, connecting to the one Host. The Clients and the Host must be running the same version of the software in order to properly communicate.
Installing the Host
The WMS Host is meant to be installed on a server which will act as the host for the clients running the WMS application. The WMS Host and Client files are packaged as part of the Deacom application updates, so installing the Deacom update will place both sets of files on the server. When updating Deacom, be sure the WMS Host is not running on the server before beginning the update. Multiple hosts may be running simultaneously, but only one host can run per computer\database. The WMS Host can run in one of two modes on the server:
- Service: the WMS Host can run as a service in the background on the server
- GUI Application: the WMS Host can run as an application which is better suited for constant monitoring
Instructions for each option are included in the sections below.
Running the host in a multi-facility environment
The recommended configuration when there are multiple facilities (customer sites) is to have the host installed and running on a server for each facility. In other words, each facility should have a physical server where the host will be installed and running just for that facility. Specifically, there needs to be one console per facility and on the same subnet.
Scanners can then be connected to the appropriate server in the facility where the scanners will be used. This also allows the users to connect to the appropriate network printers for their facility. Note that while the WMS clients transfer small amounts of data, it's important to attempt to minimize the latency of the WAN connection to get the best possible performance. Latency can be viewed by running the PING command at the command prompt from each remote facility.
Installing the Client
The installation of the client software on the barcode scanner is a two step process; verifying the network connection and installing the WMS Client software on each individual scanner. Customers now have the option to pick where the WMS client and update agent are installed, so they can be installed in persistent memory like an SD Card or the Application folder instead of Program Files.
Installing the WMS application
Note: Before beginning anything regarding the WMS installation, users must first have the Windows Mobile Device Center (WMDC) installed on the PC running the install. This is an application that should automatically install itself when a scanner is docked via Windows Update/Drivers. If it does not install automatically, please download and install the correct 32/64 bit copy from Microsoft.
Issues regarding Windows 10 and Windows Mobile Device Center Communication
Users on a Windows 10 environment may face issues when attempting to install Deacom WMS onto their mobile device. This issue is a result of the Windows 10 Creators Update which introduced .NET Framework 4.7. The update causes WMDC to no longer recognize a docked device and will not prompt the program to open, ultimately leading to Deacom WMS being unable to install. To resolve this issue, there are a few options. The preferred fix is a one-time installation update known as the WMDC-Helper.exe. Check for instructions from Juniper Systems website to complete the preferred solution.
Installing and setting up Android WMS
Notes: As of 06/10/2021 the Android WMS App installer is not yet functional. Please use the Manual Install process to deploy the Android WMS app onto compatible Android handheld devices. A Honeywell CK65 was used to develop the manual install process, however, the process should be exactly the same for all other scanner models running the Android.
Installing and Setting Up Android WMS (Model: TC20)
- Setting up the Installer
- Navigate to the Deacom application folder (e.g., \\server8\QA\Customer Test Systems\QA - 16.04)
- Open the ScannerMultiPlatform folder
- Open the Android folder
- Double-click Deacom.WMS.InstallerSetup.msi to begin the install process > The WMS Android Installer Setup window opens
- Hit ‘Next’ > Choose your install location > Hit ‘Next’
- Hit ‘Install’ > Select ‘Yes’ to the administrator prompt > See that the installation completes
- Check ‘Launch Deacom WMS Android Installer’ and hit Finish
- A Deacom logo should appear in your icon tray indicating that the WMS Android Installer is running
- Installing Android WMS on your Android scanner
- Connect the TC200J Android Scanner to your laptop
- A notification for WMS Android Installer will appear saying that the installation process has begun
- After a few seconds, another notification will appear saying the installation completed
- Unlock the Android WMS scanner and swipe up from anywhere on the home screen
- Scroll to the bottom of the list of applications and you should see an app called WMSAndroid.Android (the app logo has a white ‘X’)
- Configuring the DataWedge profile on your Android WMS scanner to allow for barcode scanning
- To install the DataWedge profile, follow the instructions at this link: (https://techdocs.zebra.com/datawedge/8-1/guide/createprofile/) (Note - an alternate set of instructions for setting up the DataWedge is included in step 2 of the Installing and Setting Up Android WMS (Model: TC22) section below)
- From the device apps/activities list, select com.deacom.wmsinterim
- From the app activities list, select asterisk (*) to associate al app activities with the Profile
- From the Decoders screen (accessible from the Input screen), make sure the following bar codes are checked off in addition to the default options already checked:
- Datamatrix
- All EAN bar codes
- Grid Matrix
- All GS1 bar codes
- Back on the Profile menu, under Keystroke output ensure ‘Enabled’ is NOT checked
- Next, under the Intent output section, verify the following:
- Enabled is checked
- Intent action: com.deacom.wms.ACTION
- Intent delivery: Broadcast intent
- Under Profile menu, navigate to the Barcode input section > Click ‘Configure scanner settings’:
- Click Decoder params > Code128 > Un-check ‘ISBT Table’ and ‘ISBT128’
- To install the DataWedge profile, follow the instructions at this link: (https://techdocs.zebra.com/datawedge/8-1/guide/createprofile/) (Note - an alternate set of instructions for setting up the DataWedge is included in step 2 of the Installing and Setting Up Android WMS (Model: TC22) section below)
Installing and Setting Up Android WMS (Model: TC22)
- Installing Android WMS on your TC22 scanner
- Connect your TC22 scanner to your laptop (Note: the scanner needs to be undocked and plugged into the computer directly using the USB cord)
- On the scanner, swipe down from the upper left corner of the device
- Expand the ‘Android System’ dropdown
- Hit ‘Tap for More Options’
- Set ‘USE USB FOR’ to ‘File Transfer’
- On your laptop, navigate to the Deacom application folder (e.g., \\server8\QA\Customer Test Systems\QA - 16.04)
- Open the ScannerMultiPlatform folder
- Open the Android folder
- Copy and paste the "com.deacom.wms.apk" file to your scanner’s Internal shared storage drive
- On the scanner > Swipe up from the Home Screen to bring up a list of applications > Open ‘Files’ > Click the hamburger icon in the upper left corner > Click ‘TC22’ > Scroll down and you should see the APK file you copied
- Click the APK file > Hit ‘Continue‘ > Hit ‘Install’ > The app should now be installed and ready to connect to an automation console or service
- Configuring the DataWedge profile on your Android WMS scanner to allow for barcode scanning
- To install the DataWedge profile, download the software from the following and follow the instructions listed below: (https://techdocs.zebra.com/datawedge/8-1/guide/createprofile/)
- On the scanner > Swipe up from the Home Screen to bring up a list of applications > Open ‘DataWedge’.
- Click the hamburger icon in the upper right corner and click ‘New Profile’.
- Enter a name for the new Profile and click ‘OK’.
- Tap on the newly created profile to show the Profile screen
- Ensure ‘Profile Enabled’ is checked.
- Click ‘Associated apps’
- Click the hamburger icon in the upper right corner and click ‘New app/activity’
- Select ‘com.deacom.wms.apk’.
- Select ‘*’ from the Activity list.
- Click the back arrow/button to return to the Profile screen.
- On the Profile screen, click ‘Scanner selection’ under Barcode Input.
- Select the desired scanner.
- Click the back arrow/button to return to the Profile screen.
- Click ‘Configure scanner settings’
- Click ‘Decoders’.
- Ensure the following options are checked:
- Datamatrix
- All EAN barcodes
- Grid Matrix
- All GS1 bar codes
- Ensure the following options are checked:
- Click on ‘Code128’.
- Uncheck ‘Check ISBT Table’.
- Uncheck ‘Enable ISBT 128’.
- Click the back arrow/button to return to the Decoders screen.
- Click the back arrow/button to return to the Scanner Configuration screen.
- Click the back arrow/button to return to the Profile screen.
- Click ‘Decoders’.
- Under Keystroke output ensure ‘Enabled’ is NOT checked
- Under Intent output, ensure ‘Enabled’ is checked
- On the ‘Intent Action’, enter “com.deacom.wms.ACTION”.
- Click ‘OK’.
- Choose “Broadcast intent” for ‘Intent delivery’.
Installing and Setting Up Android WMS via Manual Install (Model: CK65 & Zebra MC330K)
- Note: The steps below are essentially the same for the TC20, TC22, and MC9400 scanners with the exception of Step 2. This step does not apply to these scanners.
- Installing Android WMS on your Android scanner – Manual Install
- Connect the CK65 Android Scanner to your laptop
- Navigate to the Deacom application folder (e.g., \\server8\QA\Customer Test Systems\QA - 16.04)
- Open the ScannerMultiPlatform folder
- Open the Android folder
- Transfer the ‘com.deacom.wms.apk’ file to the Downloads folder on the scanner
- Internal Shared Storage > Downloads
- Launch the ‘Files’ app on the scanner and navigate to the Downloads folder
- Run the file by pressing it on the scanner
- Say Yes/Ok/Approve on the various prompts confirming your choice to run and warning you of the risks when installing external apps.
- When the manual install has completed DEACOM will launch and bring you to the host selection form.
- The shortcut for Deacom is now available within the All Apps screen on the scanner.
- Configuring the DataWedge profile does not appear to be necessary for the CK65. The default profile allows for the scanning of GS1128, UPC, Code 3of9, and DataMatrix barcodes. If you are using the TC20, TC22, or MC9400 models, please defer to their install and setup instructions for DataWedge configuration process.
Disabling onscreen keyboard for Android scanners
Most users will utilize a barcode scan to input data on the scanners. However, in situations where the scanner keyboard will be used, users may opt to disable the onscreen keyboard. This keyboard usually displays in front of the Deacom WMS application and makes using the Deacom WMS application difficult. The onscreen keyboard can be disabled in Android settings.
Configuring a remote display
The remote display option allows a user to connect to a scanner from their PC for the purpose of displaying the scanner screen in real time. The option is particularly useful when training multiple users on scanner operations and WMS transactions. The sections below detail the process for installing and running the remote display.
Installing remote display for Windows OS
Note: The scanner host must be installed prior to running the remote display executable. Note: The files necessary to install the remote display are not part of the Deacom install package.
-
Install the Microsoft Remote Display Control software by double clicking on the executable file: remotedsp.exe, located in the Scanner - Host - Remote Display Support folder within the Deacom application folder or by downloading the following zip file: RemoteDisplaySupport.zip. Make sure the handheld is connected to the PC via ActiveSync or Mobile Device Center before starting the installation.
-
A window will appear and guide you through the rest of the installation process.
-
This will install the program on the PC and will also install the client onto the handheld device.
-
The application installed on the PC is a host application that pulls in the handheld screen. The application installed on the handheld connects to the host and relays the screen.
Running remote display for Windows OS
-
Connect the handheld and PC via ActiveSync or Mobile Device Center
-
Go to Start > Programs on your PC and find "Remote Display Control" and click on the "Remote Display Control Host" link.
-
This will start up the host side of the application.
-
Now start the application on the handheld. Click the icon for "Cerdisp" on either the scanner desktop or via Start > Programs. Click OK on the about screen.
-
Click the "Connect" button, enter the IP address of the computer to which you want to project the handheld screen, and then click OK. Now you should see the handheld screen on your PC.
Installing and running remote display for Android OS
The steps below are for installing and running Remote Display (GTM Client) on Android Scanners (Model: CK65)
These instructions for installing the GoTo Meeting app are using the APK file directly. The app can also be installed from the Google Play Store but doing so requires you to sign in on the device with a Google account. Apps must be updated through the Google Play Store, so signing an account into the device will be necessary from time to time, regardless of how apps are being installed.
Installing GoTo Meeting on your Android scanner – Manual Install
-
Connect the CK65 Android Scanner to your laptop
-
Download the GoTo Meeting APK file <here>
-
Use File Explorer to open your Downloads folder
-
Transfer the ‘com.gotomeeting.apk’ file to the Downloads folder on the scanner
-
Internal Shared Storage > Downloads
-
-
Launch the ‘Files’ app on the scanner and navigate to the Downloads folder
-
Run the file by pressing it on the scanner
-
Say Yes/Ok/Install on the prompts
-
You will be returned to the desktop when the manual install has completed
-
The shortcut for GoTo Meeting now shows within the All Apps screen on the scanner
-
Connect to a meeting by launching the app and entering a meeting ID
Performing cold, clean, or warm boots
A cold or clean boot restarts the scanner and erases all user stored records and entries that are not saved in flash memory (Application and Platform folders) or a memory card. In most cases, a cold or clean boot should only be performed if a warm boot does not solve the problem.
In many cases, cold boots and clean boots perform the same function. The decision as to when to use a clean boot or cold boot depends on the scanner model and/or operating system on the scanner as indicated below.
The steps for performing cold, clean and warm boots are included below.
Performing a warm boot - all models
-
Hold down the Power button for approximately five seconds. As soon as the scanner starts to perform a warm boot release the Power button.
Performing a cold boot - MC9090, MC9190
-
Press the primary battery release on the scanner to partially eject the battery. Do not completely remove the battery.
-
While the battery is partially released, simultaneously press and release both the handle/scan trigger and the Power button.
-
Push the battery to fully re-insert it into the scanner. One audible click may be heard as the battery is fully inserted.
-
At this point the scanner will reboot and perform the necessary initialization steps.
-
Calibrate the screen. Using the stylus carefully press and briefly hold the tip of the stylus on the center of each target that appears on the screen. (Note – to re-calibrate the screen at any time, press the FUNC+ESC keys to launch the calibration screen application.)
-
Repeat as the target moves around the screen or press to ESC to cancel once you are satisfied with the calibration.
-
At this point, the scanner has successfully been cold booted. Users will next need to re-install the WMS client software on the scanner. The instructions for performing the client software installation is available in the "Client Installation" section of this page.
Note: In situations where the cold boot does not work for the MC9090 or 9190 models, the clean boot process below may be used, even if the OS is not Windows Mobile 6.5
Performing a clean boot - for use with MC9190 scanner using the Windows Mobile 6.5 operating system
-
Download the Motorola clean boot file from the following link MC 9190 WM 6.5 Cold Boot File Users will need to accept the terms prior to beginning the download.
-
Unzip the downloaded files onto your computer
-
Plug in the scanner dock to computer if it has not already been done.
-
Open Windows Mobile Device Center on the computer
-
Place scanner on the cradle
-
After the scanner has connected, in windows mobile device center, click ‘Connect without setting up your device’ > ‘File Management’ > ‘Browse the contents of this device’
-
Unzip the files to the \temp folder. Note: If you are unable to find this using windows mobile device center, unzip them to a different folder and copy them to the temp folder on the scanner itself. Make sure all 4 files are transferred to the Temp folder on the scanner. The scanner will not successfully clean boot without all 4 files.
-
While the scanner is still docked, navigate to the temp folder and run file ‘startupdldr.exe’
-
The update will take about one minute to complete. Do not remove the device from the doc during this time.
-
When the update is complete, the device will be clean booted. A good way to tell is that the calibration screen will appear once the operating system has loaded.
Performing a clean boot - MC9200 series (9290, 92N0-G)
-
Put the scanner on the dock and plug the dock into computer via USB cable.
-
Take the Boot files on the computer and put it into the Temp folder on the scanner. If the boot files are not on the computer, the links below this section may be used to obtain the files.
-
The file name is startupdldr.exe. Run this file. This is in the Temp folder. Run this on the scanner.
-
Calibrate the screen. Using the stylus carefully press and briefly hold the tip of the stylus on the center of each target that appears on the screen. (Note – to re-calibrate the screen at any time, press the FUNC+ESC keys to launch the calibration screen application.)
-
Repeat as the target moves around the screen or press to ESC to cancel once you are satisfied with the calibration.
-
At this point, the scanner has successfully been cold booted. Users will next need to re-install the WMS client software on the scanner. The instructions for performing the client software installation is available in the "Client Installation" section of this page.
Note: Motorola manuals and websites contain information dealing with cold boot instructions. Deacom, however, recommends the clean boot process when it becomes necessary to reboot scanners.
Alternate clean boot process - for use if the above clean boot methods fail
The page https://www.mobilitysolutions.cz/eng/faq/mobile-computers/factory-resets offers a scannable clean booting process so long as the scanner is connected to the internet. It is a simpler option than the existing process of downloading and unzipping the files from Zebra, transferring them to the scanner using WMDC, and then running the clean boot program on the scanner. The link has instructions on how to use the functionality and has embedded links to all the different scanner model and OS combos that this process can be used on.
Motorola boot files
The below links are for compressed folders that contain the specified boot files.
MC9090 cold boot files
Notes:
If after performing a cold boot and installing the WMS application, the WMS application contains to attempt the cold boot process, check the temp directory on the scanner to ensure the cold boot files are no longer stored there.
Last Resort: Performing a manual install
If all other techniques, processes, and attempts fail, the below guide may be used to perform a fresh WMS install/re-install. Keep in mind, all scanner models are slightly different, so buttons and links may vary in appearance and location. For WMS requirements, refer to the Warehouse Management Systems Requirements page and for steps on how to provision a WiFi profile on a scanner, refer to the "Provisioning a WiFi profile on a scanner" section above.
Removing existing WMS installers
On the PC:
-
Remove any existing WMS Installers:
-
Control Panel > Add/Remove Programs > Uninstall the old Deacom WMS Client Installer.
-
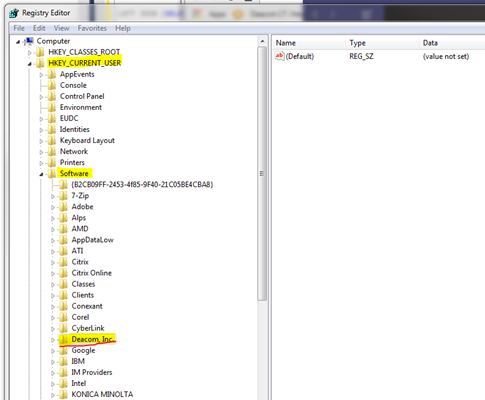
Open RegEdit (Registry Editor) and delete the “Deacom, Inc.” folder under HKEY_CURRENT_USER > Software (Right click the folder and select “Delete”)
-
-
Open the Production folder > Copy the "Scanner" folder to your Desktop.
-
Inside the copied Scanner folder – run the file Installation file "installwmsclient.exe".
-
If you get a prompt for "Persist" mode, click "Apply".
On the Scanner:
-
Remove any existing WMS clients:
-
Desktop > Settings > System > Remove Programs.
-
Remove the programs:
-
Deacom Inc. Deacom.WMSClient
-
Deacom Inc. Deacom.UpdateAgent
-
MS .NET CF 3.5 EN-String
-
Symbol Managed Class Libraries
-
Deacom Inc MC3000Keyboard
-
Also on the scanner (for verification):
-
Desktop > File Explorer > Program Files – Ensure that the "Deacom.WMSClient" and "Deacom.WMSUpdateAgent" folders are both removed. If they’re still there, remove them.
-
Dock the scanner and the install should kick off. If you do run into an issue where it does not install to the scanner, it likely dumped all of the files into the scanners Temp directory.
If the installer fails:
On the workstation (while scanner is still docked), navigate to C:\Program Files (x86)\Deacom, Inc\Deacom WMS Client Installer and manually copy out the .cab files (below) and paste them directly onto the Scanner. On the WMS Scanner, you can go into the File Explorer and create a folder called “CAB Files” within the Program Files directory.
This will require the CAB files to be installed manually from the \Temp directory by simply tapping on file. Each CAB should be installed in its default location and they should be installed in the following order:
-
NETCFv35.wm.armv4i.cab
-
If you get a prompt that a later version is installed, click okay and skip this file and move onto the next one.
-
-
NETCFv35.Messages.EN.cab
-
MC3000Keyboard.cab
-
symbol.all.arm.cab (this will trigger a prompt to reboot the scanner, tap OK)
-
WMSClientPackage.cab
-
WMSUpdateAgentPackage.cab
Note: If either of the NETCFv35 CAB files are not present in the \Temp directory, this most likely means the .NET Compact Framework v3.5 is already installed on that device.
Running the Automation Console/Service for both test and live environments
Users can run both services on the same server at the same time if they are using different ports. The Automation Service uses whatever port is specified in the deacom.ini file. So, that should be set to a different port before starting one of the services. Use the steps detailed in Deacom Automation Service and Console to uninstall the service, then perform the following to install the new Automation Service.
-
Ensure the deacom.ini "SVCPORT" value in the Live and Test system is set to different values. For example; if the Live system is 91, make the Test system 92.
-
Use the same Command Prompt session as above or run Command Prompt as Admin
-
Type in the following command to create the ‘Live’ systems automation service and press enter to execute: “sc create "Deacom.Automation.Service.Live" binPath="C:\DEACOM\Live\deacom.automation.service.exe -allowmulti" start=auto”
-
The Command Prompt will respond with “[SC] CreateService SUCCESS”
-
Type in the following command to create the ‘Test’ systems automation service and press enter to execute: “sc create "Deacom.Automation.Service.Test" binPath="C:\DEACOM\Test\deacom.automation.service.exe -allowmulti" start=auto”
-
The Command Prompt will respond with “[SC] CreateService SUCCESS”
-
Go to the Service Management console for the computer and change the login user for the services if required.
-
Use the Service Management console to start the services.
-
Test your WMS clients.
Networking in Deacom WMS and timeout issues
Deacom utilizes the standard TCP communication protocol for transferring data(packets). Since TCP guarantees the delivery of packets, the system does not have any special logic to ensure packet delivery. When troubleshooting timeout issues, be user to reference the recommended scanner settings on this page. Other points to consider are listed below.
-
Is there a certain transaction that the users are seeing a dropped connection when completed on the WMS?
-
When the users see a dropped connection, it might be worth taking a look at the connection between the SQL server and the automation service. On the SQL server see if a query lock has occurred on the automation service that might be forcing users to wait in line.
-
For the wireless connection on the scanner, are they connecting on the 2.4 GHz or 5.0 GHz?
Enabling Voice Recognition
Beginning in version 17.02.008, the WMS application supports the use of voice commands for menu navigation and button selection on scanners using Android OS.
The features are set by configuring the "Voice Output" and "Require Voice Recognition" fields in System > Maintenance > WMS Form Layouts, and the "WMS Record Button", "WMS Record Key", and "WMS Show Record" fields on User records, in Inventory > Options, and in the settings on the scanner itself. When using this feature, the field captions and data populated in the fields will be read back to the user.
Printing requirements
For WMS Printers that will be accessed from the scanners need to be installed on the machine that is running the WMS service or host console. Printing labels from WMS requires Microsoft Office and necessary barcode fonts to be installed on the machine running the WMS service or host console. If experiencing issues printing from the WMS service, run as a console to verify that printing works with that setup. If printing from the console works, the service needs to be run from a user with the correct permissions.
Note: If running in Windows 2008 Server 64-bit, the directories below will have to be added in order to enable printing
- C:\Windows\SysWOW64\config\systemprofile\Desktop
- C:\Windows\System32\config\systemprofile\Desktop
Additional information as well as frequently asked questions regarding printer setups is available via the Configuring Printers page.
Individual User WMS printer setting
An individual user may be assigned to a specific WMS printer via the "WMS Printer" field on the edit user form via System > Maintenance > Users. If a user is assigned to a specific printer, and this printer is installed on the machine that is running the WMS Host, then this printer will be set as the default printer on the scanner anytime this user logs into the WMS application. Note that the "WMS Printer" field on the user record contains a "None" option. This allows users to move to different locations in a warehouse or plant and select different printers on the scanner as opposed to being restricted to the printer set on their user record in the system.
Networking in Deacom WMS and timeout issues
Deacom utilizes the standard TCP communication protocol for transferring data(packets). Since TCP guarantees the delivery of packets, the system does not have any special logic to ensure packet delivery. When troubleshooting timeout issues, be sure to reference the recommended scanner settings on this page. Other points to consider are listed below. Is there a certain transaction that the users are seeing a dropped connection when completed on the WMS? For the wireless connection on the scanner, are they connecting on the 2.4 GHz or 5.0 GHz?
Enabling Voice Recognition
The WMS application supports the use of voice commands for menu navigation and button selection on scanners. The features are set by configuring the "Voice Output" and "Require Voice Recognition" fields in System > Maintenance > WMS Form Layouts, and the "WMS Record Button", "WMS Record Key", and "WMS Show Record" fields on User records, in Inventory > Options, and in the settings on the scanner itself. When using this feature, the field captions and data populated in the fields will be read back to the user.
FAQ and Diagnostic Tips
Tips:
- In situations where your scanner is closing the Deacom WMS application, users may wish to check to see if there scanner model has any CPU power settings that might be the cause. In some models, the path would be Start -> Settings -> System -> Power -> CPU Power. Changing the setting from say auto to max should resolve the issue.
- If the Deacom software disappears from the scanner, dock the scanner to the original computer used to install Deacom and the software should install automatically. If that does not work, reference the Client Installation part of this page to reinstall the Deacom software.
- The "Timeout Minutes" field on the General tab of user records via System > Maintenance > Users controls how many minutes of inactivity before the user is logged out. In this case, the user is prompted indicating they have been logged out and are taken back to the login form.
What do I do if the WMS Client disappears from the scanner?
Reconnect the scanner to a computer with Deacom on it. If the WMS Client does not begin installing immediately on the scanner, run the InstallWMSClient.exe as administrator from the Deacom Production Folder\Scanners.